NoiseFX
Table of contents
The NoiseFX tool simplifies the procedural control of effects on selected Flair materials. The tool is opened by clicking on the NFX shelf icon and shares the same window with the VertexFX tool.

Each Flair material (including proxies) supports NoiseFX, but the effects driven by NoiseFX depend on the loaded style. To apply NoiseFX, select an object with a Flair material and modify the desired slider.
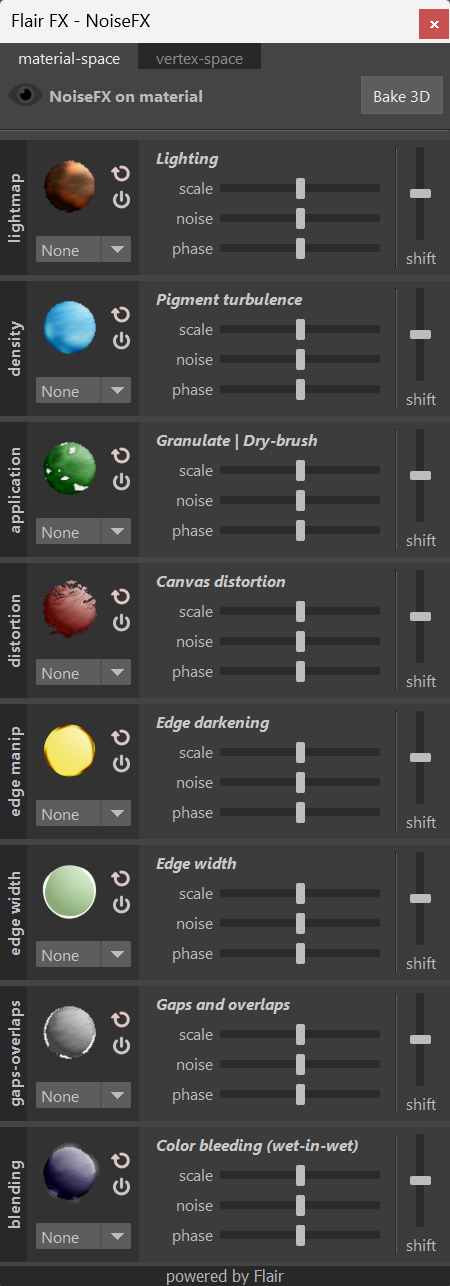
From top to bottom, these are the different elements of the NoiseFX tool.

On the top-left, you will find an eye button which toggles the parameter view. This will allow you to view the control parameters that you are currently affecting through the NoiseFX Widgets.

On the top-right, you will find the reset button, which resets ALL NoiseFX of either, the selected objects, or ALL objects in the scene when no selection is active. A prompt will ask for confirmation, listing the objects that will have their NoiseFX removed.
Next to the reset button is the Bake 3D button. This button toggles the Animated setting in the assigned Flair materials, baking the current 3D position of objects. Baking is useful to attach the current NoiseFX patterns to an animated/deformed object. If the 3D position is not baked, NoiseFX will “float” in 3D space, instead of moving with animated objects.
Noise widgets
Each style has different effects, therefore, the noise widgets (sections) will vary depending on the currently loaded style. Each widget handles a specific effect/behaviour within the style e.g., Lighting, Pigment turbulence, Color bleeding.
On the left side of each widget, you will always find a generalized term for the behaviour of each effect. Right next to it, there will be a sphere icon that gives a preview of what the effect will do.
Toggle/reset
To the right of the preview icon, you will find two buttons.

This button resets the NoiseFX values for that effect, allowing to start anew or completely remove its influence. This button is smaller than the reset ALL NoiseFX button at the top-right of the window.

This button toggles the NoiseFX on/off to visualize the influence that the noise makes for the style.
NoiseFX type
Directly underneath the preview icon, there is a combo box widget that gives the ability to change between different noise types.
- None - No NoiseFX is applied
- Simple - Default simplex noise
- Cloud - Fractalized noise resembling the cloud noise in Photoshop
- Custom - Custom noise, which can be written in glsl
flair/maya/shaders/material/include/noise.glsl[customNoise(vec4 v)].
When multiple materials are selected and each one contains a different noise type, the combo box widget will be highlighted in red.
Modifying noise
Modifying noise is simple, select the object with the material that you wish to modify and use one of the three relative sliders.
- Scale - Modifies the scale of the 3D/2D noise for the specified effect [noise frequency]. The scale will be relative to the World Scale global attribute.
- Noise - Modifies the contrast (how strong it is) of the noise for the specified effect. Keep in mind that noise is composed out of positive and negative values and the contrast amplifies the noise in both directions [noise amplitude].
- Phase - Modifies the phase of the noise to get different patterns at the same scale [noise phase].
- Shift - Shifts the noise towards positive or negative values, accordingly [noise shift].
Showcase
Here we select the object that contains the material to which we want to add NoiseFX onto. Using the NoiseFX tool, we modify the noise, scale and offset of the density to create a natural-looking pigment turbulence effect.
Internal workings
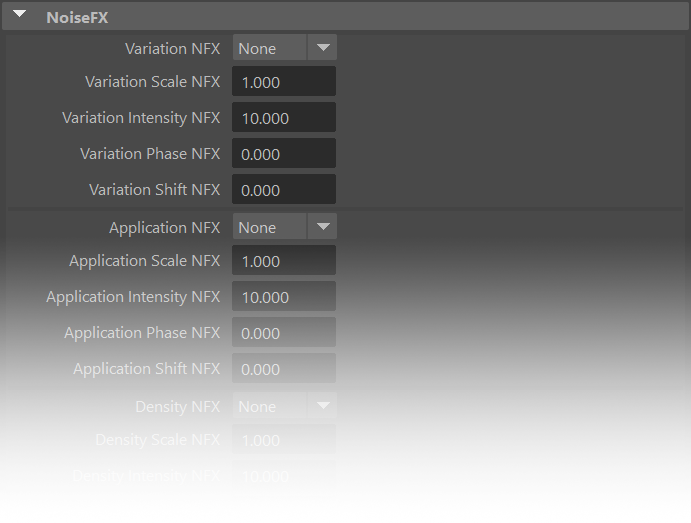
The NoiseFX tool simplifies the toggling and modifying of procedural attributes on Flair materials.
These can be found within each material when opening the NoiseFX group in the Attribute editor.

FAQ
Can I change the type of noise that NoiseFX uses?
Yes, you can write your own noise function for the Custom noise type. However, you will need to modify the material glsl shader code to do so at flair/maya/shaders/material/include/noise.glsl [customNoise(vec4 v)].
