Lines shader style
Table of contents
Style breakdown
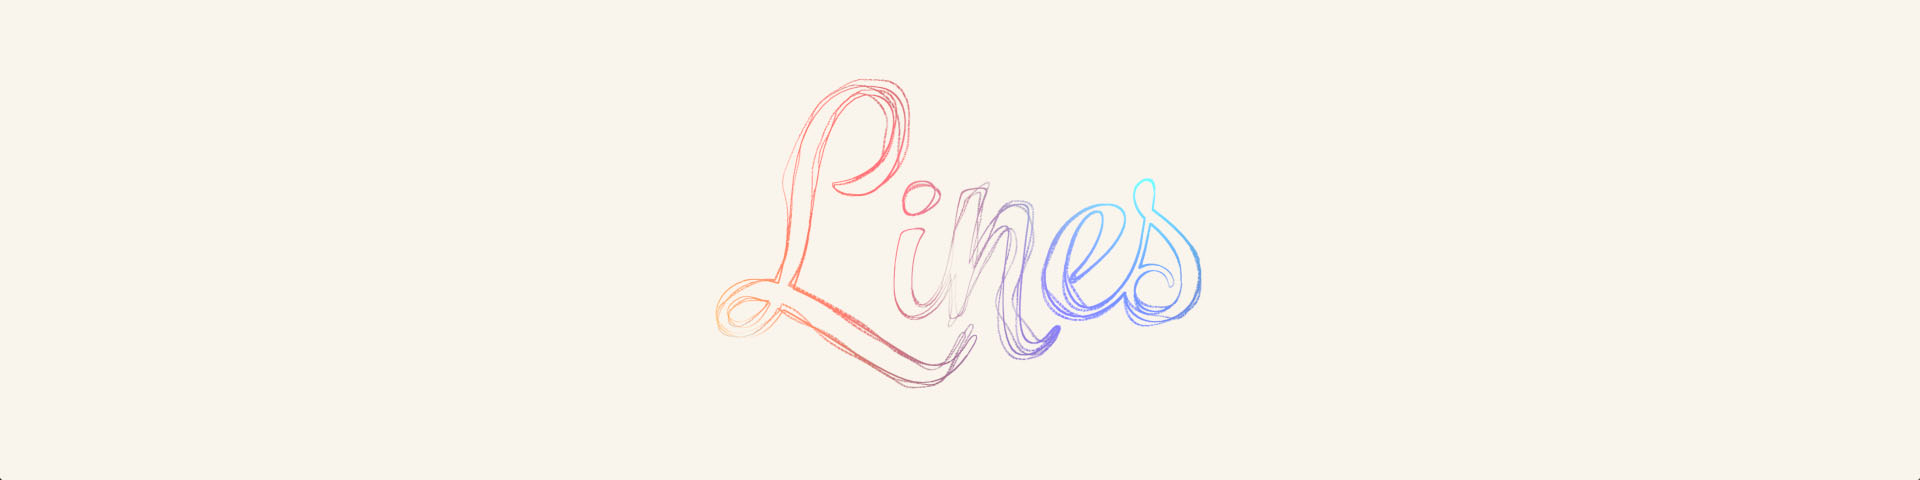
The lines shader style is all about generating lines for all kinds of linework to outline the form of 3D geometry. From clean toon lines to the more rough sketch lines, you can control and art-direct them to match your artwork. The shader style also provides other painterly effects often found using traditional painting media such as pigment turbulence, canvas granulation and dry-brush.
The lines in this shader style are generated from three different types of data: color, normals and depth. So, whenever there is a high enough difference between neighboring pixels of the specific data type, a line is generated. This line is then dilated to become wider or narrower and offset from its original position in the case of rough sketch lines.
This shader style depends on the Flair material, which can be assigned onto any mesh object. The material embeds painterly reflectance models and supports the art-direction framework of Flair. The material also contains an Animated setting attribute, which allows to attach rough sketch line offsets to animated objects.
The lines shader style may not have all features that you need. So please let us know if we can help polish the look exactly to your requirements and pipeline.
Tutorials
Attribute breakdown
In this section, we only document global attributes specific toon and sketch lines shader style. To learn more about other global attributes, please refer to the globals node documentation.
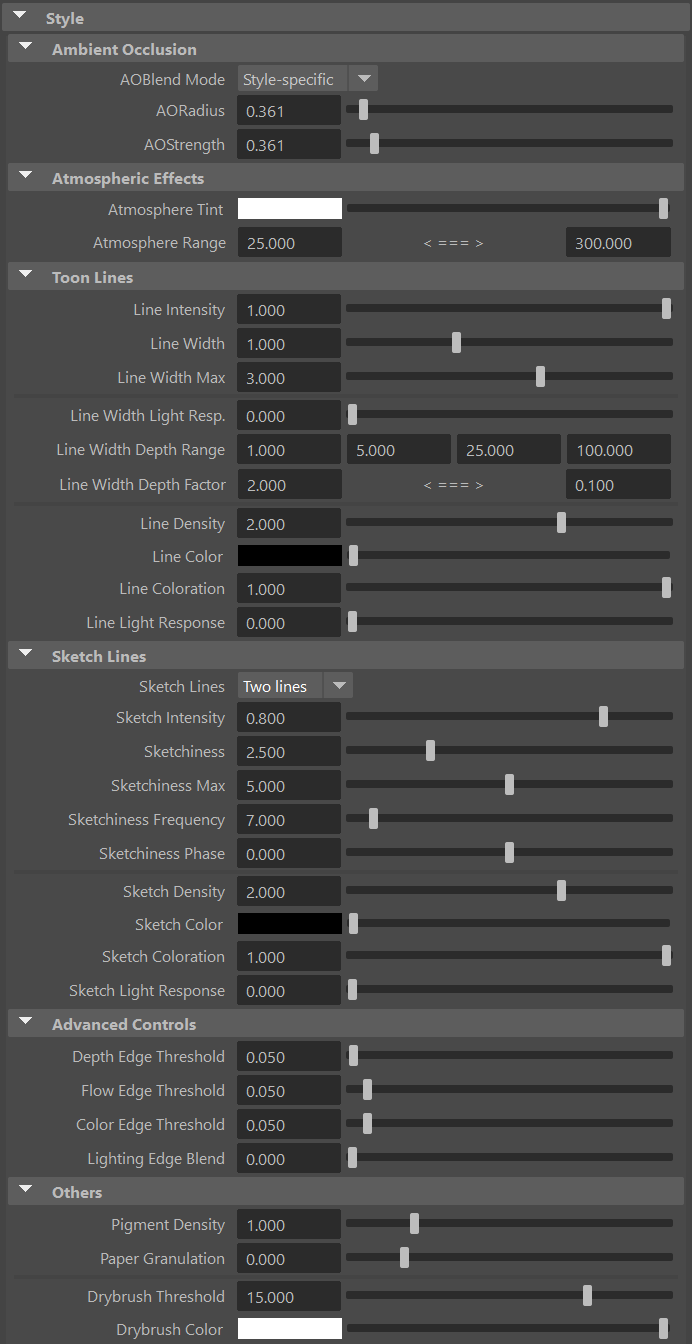
Ambient Occlusion
Ambient Occlusion (AO) darkens the image in areas that are hard to reach for the ambient light due to the local shape of the geometry (e.g. concavities, crevices, holes). Note that this effect depends only on the geometry (and the viewpoint, to a lesser extent), and not on the lights present in the scene.
Flair currently uses a screen-space implementation of ambient occlusion based on the Ground-Truth Ambient Occlusion algorithm (GTAO).
AO Blend Mode
Defines how the computed ambient occlusion is applied on the final image.
- None: AO is not applied.
- Multiply: the AO is multiplied over the image.
- Color Burn: same as above, except that the AO is blended over the image using the Color Burn blending mode.
- Style-specific: AO is applied by the current style, so the effect depends on the style implementation. (default)
- With styles other than the Graph styles, the AO modulates the pigment density, resulting in darker colors in occluded areas.
AO Radius
The radius used by the ambient occlusion filter: larger radius results in larger darkened areas.
AO Strength
The strength of ambient occlusion: higher values make the ambient occlusion darker.
Atmospheric Effects
Atmospheric effects are useful to add atmospheric depth to bigger scenes by changing the color within a specific range.
Atmosphere Tint
Defines a custom atmospheric perspective color, making things at distance tint towards the specified color.
Atmosphere Range
Defines the range at which the atmospheric tint will start and end. Set these values high to not have the atmosphere range affecting your scene.
If you wish to exclude an object from the atmosphere tint affect (e.g., a background plane), enable the Final Color attribute in the Flair shader material assigned to that object.
The range is set for Maya units multiplied by the World Scale, consider this when setting up this attribute.
Lines
The lines group contain attributes that affect all types of lines, clean toon lines and rough sketch lines alike.
Line Width
Width of all generated lines.
Line Width Max
Maximum possible width the generated lines may have after art-direction.
Set this attribute as low as needed to optimize performance.
Line Width Light Response
The influence lighting will have over the width of the line. Positive Line Width Light Response will thin the line on lit parts, whereas a negative Line Width Light Response will thin the line on parts within the shade.
Line Width Depth Range
The depth range at which toon and sketch lines are widened or thinned in the scene. This attribute consists of four (4) values that define the different distances from the camera to modify the line width. From left to right: Close, Close Mid, Far Mid, Far.
Between the Close Mid and Far Mid distances, the global Line Width that has been set will apply. Beyond these distances towards the Close and Far depths, the global Line Width will be multiplied by the Line Width Depth Factor, which is defined below.
The distances are relative to the World Scale global. For example, if the world scale is of 100, a 1000 Maya unit distance will be 10 (1000/100). If the world scale is 1, a 1000 Maya unit distance will be 1000.
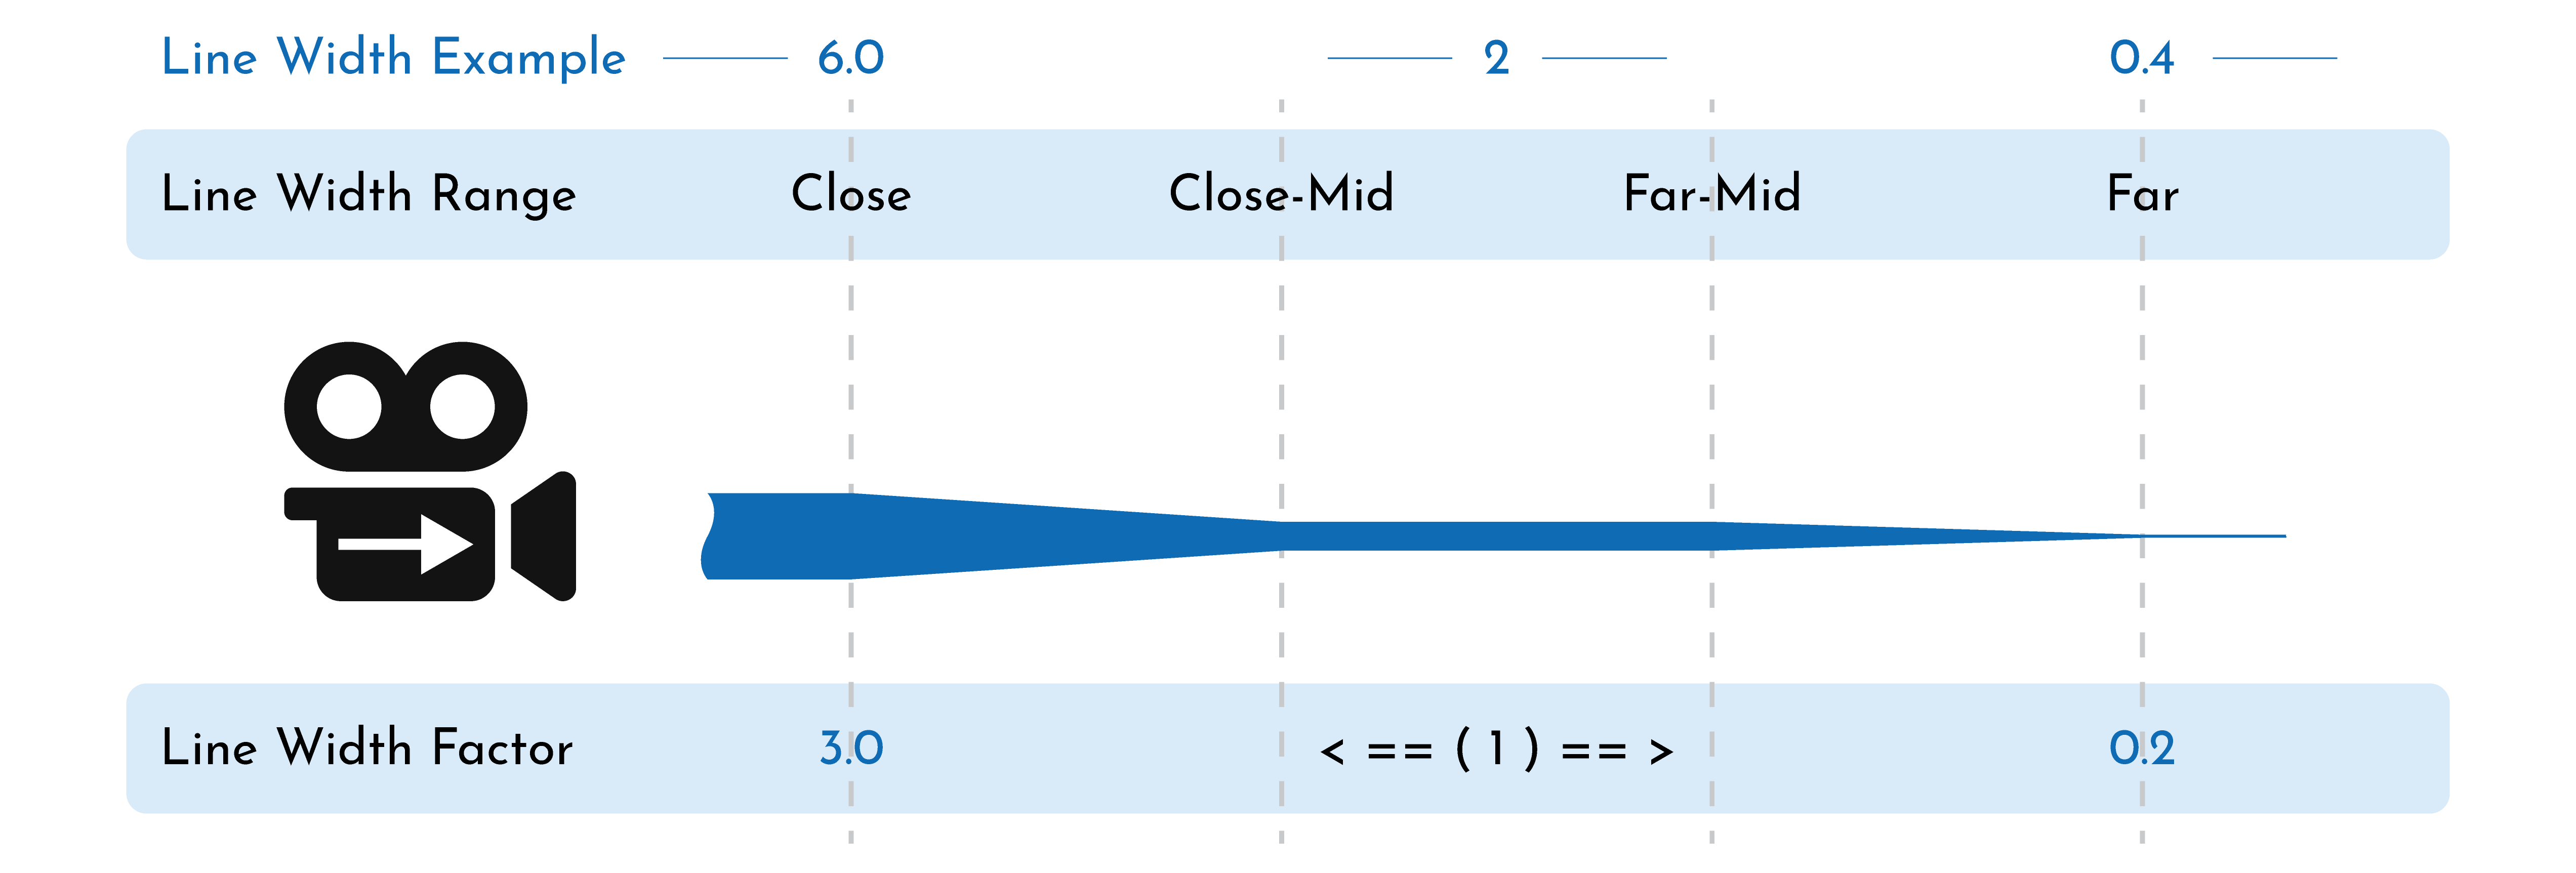
Line Width Depth Factor
The factor to multiply the toon and sketch line width, depending on the distance to the camera defined in the Line Width Depth Range. The first value is at Close distance and the second value is at Far distance.
You can set both of these values to 1.0 if you do not wish to modify the Line Width along the depth.
Outline Width Offset
Flair 1.2
The width offset affecting only outlines (silhouettes). Outlines are lines generated by the pixel depth differences at the specified Depth Edge Threshold.
Clean Lines
Clean lines can be customized in terms of intensity and color. Coloring of lines happens in the following order: Density, Coloration, Light Response.
Line Intensity
Opacity of the generated lines. A lower intensity will make the toon lines more transparent.
As lines are generated at the middle of an edge, blending the intensity will reveal the edge underneath.
Line Density
The density of the line, whereas a value of 1 equals the object’s color. A higher density accumulates color making the line more saturated and darker. A lower density makes the line brighter.
To see the full effect, the Line Coloration and Line Light Response should be set to 0.
Line Color
Global color for the lines. The amount of line coloration can be adjusted with the Line Coloration attribute below.
Line Coloration
The amount of Line Color that should be applied. A negative art-directed coloration will bring the line color back to the object’s original color.
Outline and Inline Light Response
Flair 1.2
The influence lighting will have over the color of the outline (silhouette) or inline.
In this example, we set the flairShader Diffuse Factor to 1.0, but toggle the Final Color setting so that lighting does not affect the material. That way, only the line responds to light. In cases where there is z-fighting when coloring lines, make use of the Offsets setting within flairShader materials and modify the Depth Bias as needed.
You can use the Outline Light Response to make 2D rim lights!
Rough Lines
Rough lines can be customized in terms of number of sketch lines, intensity, sketchiness and color. Remember that the width of rough lines is shared with clean lines.
Feature Noise attribute must be enabled in the Flair material to activate the sketch line(s) offset.
Sketch Lines
The number of sketch lines that will be drawn.
Sketch Intensity
Opacity of the generated sketch line(s). A lower intensity will make the sketch lines more transparent.
Sketchiness
Offset of the sketch line(s) in relation to the outline. Materials should have the Feature Noise attribute enabled for sketchiness to work.
Sketchiness Max
Maximum possible offset the generated sketch line(s) may have after art-direction.
Set this attribute as low as needed to optimize performance.
Sketchiness Depth Range
Flair 1.2
The depth range at which sketch lines are offset in the scene. These attributes work in the same way as the Line Width Depth Range and also consists of four (4) values that define the different distances from the camera to modify the sketchiness. From left to right: Close, Close Mid, Far Mid, Far.
Between the Close Mid and Far Mid distances, the global Sketchiness that has been set will apply. Beyond these distances towards the Close and Far depths, the global Sketchiness will be multiplied by the Sketchiness Depth Factor, which is defined below.
The distances are relative to the World Scale global. For example, if the world scale is of 100, a 1000 Maya unit distance will be 10 (1000/100). If the world scale is 1, a 1000 Maya unit distance will be 1000.
Sketchiness Depth Factor
The factor to multiply the sketch line offsets, depending on the distance to the camera defined in the Sketchiness Depth Range. The first value is at Close distance and the second value is at Far distance.
You can set both of these values to 1.0 if you do not wish to modify the Sketchiness along the depth.
Sketchiness Frequency
Base frequency of the feature noise controlling the sketch offsets. A higher frequency will shorten the distance between the sketch line(s) peaks, whereas a lower frequency elongates the distance, resulting in smoother and longer waves. The frequency is directly linked to the global World Scale attribute.
Sketchiness Phase
Shifts the feature noise phase, creating new shapes of sketch line(s). Useful when you want a different sketchy deformation or want to vary the sketchiness on a frame-by-frame basis.
As the sketch line(s) is generated from 3D noise, make sure to toggle the Animated attribute in materials if they are animated/deformed so that the sketch line(s) is baked in place.
Sketch Density
The density of the line, whereas a value of 1 equals the object’s color. A higher density accumulates color making the line more saturated and darker. A lower density makes the line brighter.
To see the full effect, the Sketch Coloration and Sketch Light Response should be set to 0.
Sketch Color
Defines a custom global color for the sketch line(s). The amount of sketch line(s) coloration can be adjusted with the Sketch Coloration attribute below.
Sketch Coloration
How much the sketch line(s) should be of the set Sketch Color. A negative art-directed coloration will bring the sketch line(s) color back to the albedo.
Outsketch and Insketch Light Response
Flair 1.2
The influence lighting will have over the color of the outsketch (silhouette) or insketch line(s).
We break down how to set up this example in the Outline and Inline Light Response.
You can also use sketch lines with sketch light response to make sketchy rim lights.
Advanced Controls
To generate lines, we run an edge-detection algorithm on three different types of data: depth, normals and color. So, whenever there is a difference within neighboring pixels for each data type, an edge is extracted.
There is a specific limit to the difference in depth, normals, and color that needs to be exceeded to extract an edge. This limit, in technical terms, is called a threshold. Advanced controls give access to these thresholds to adjust the generated lines.
Depth Edge Threshold
Depth threshold at which a line from depth differences is generated. 0.001 will generate an edge on minuscule depth differences, a higher value will generate an edge only after a certain depth difference has been achieved. The depth threshold is directly linked to the global World Scale attribute so that the same values can be used at different world scales.
If Flow Edge Threshold and Color Edge Threshold are set to 1.0, a high Depth Edge Threshold will only show lines at silhouettes.
Flow Edge Threshold
Flow threshold at which a line from normal differences is generated. 0.001 will generate an edge on minuscule normal differences, whereas 1.0 will remove lines from normals altogether.
Normal maps change the normals and therefore also help generate edges at specific parts of objects.
Color Edge Threshold
Color threshold at which a line from color differences is generated. 0.001 will generate an edge on minuscule color differences, whereas 1.0 will remove lines from color altogether.
Having low color edge thresholds will make the edge detection quite sensitive to noise or grunge in textures.
Lighting Edge Blend
Amount of lighting within the color pass to generate edges from. At a Lighting Edge Blend of 0.0, the color will only consist of the albedo. At a Lighting Edge Blend of 1.0, lighting will be applied too the albedo, so edges can also be generated from cast shadows and shading.
Others
Pigment Density
The concentration of pigments, giving the render either a diluted or a more saturated and darker look.
Paper Granulation
The accumulation of pigments on the valleys of the paper (canvas). Concentrates the pigments on the valleys and creates a more saturated and darker look.
Drybrush Threshold
Sharpness of the drybrush application. Using a dry brush will only apply pigments to the peaks of the canvas, leaving the canvas color appear at the valleys of its profile.
Drybrush color
Color of the drybrush application.
Art-directable Attributes
Attributes labeled as art-directable can be controlled further with NoiseFX, VertexFX and proxy materials.