Warp shader style
Previously Frayed shader style
Table of contents
Style breakdown
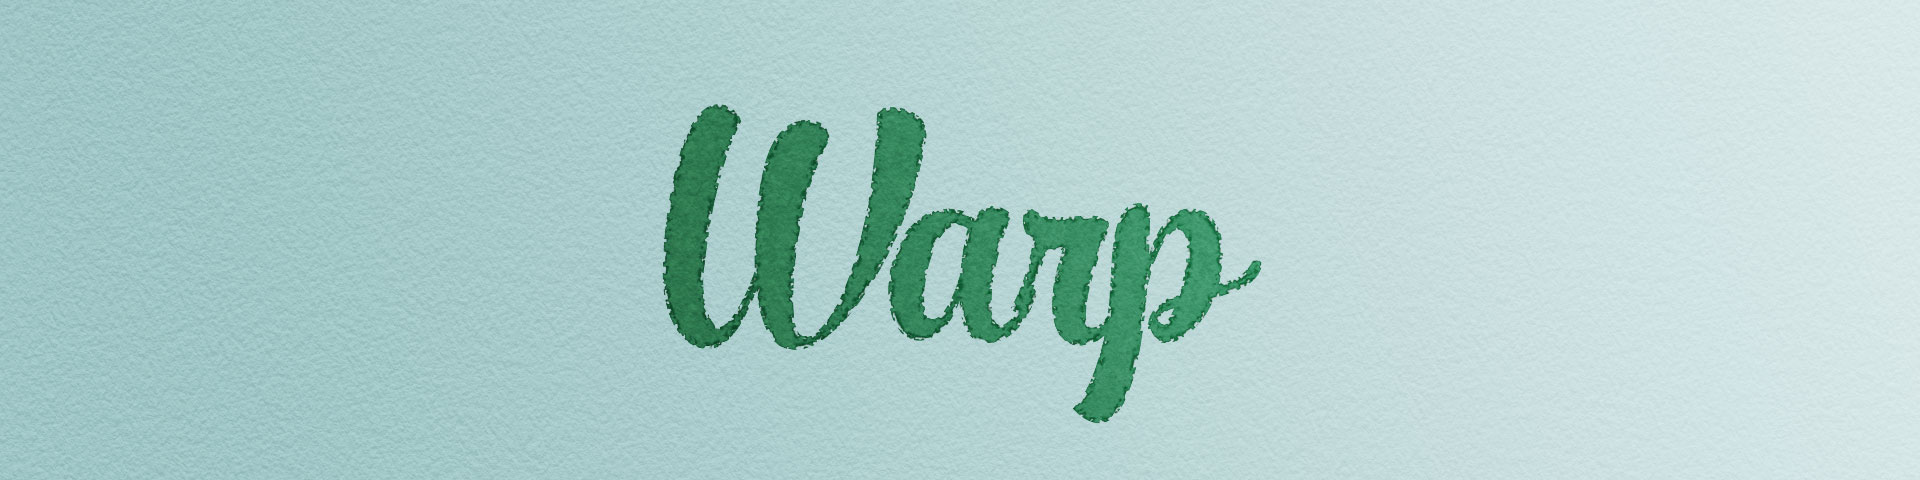
The warp shader style, similar to the fray shader style, emulates the broken edges commonly found in paintings, in 3D. It also provides other painterly effects often found using traditional painting media such as pigment turbulence, edge darkening, canvas textures and more.


The broken edges from the warp shader style are generated by rendering a separate inflated 3D noise for each object. This noise is fractalized so that the broken edges retain the same pixel size, no matter how close/far the object is from the camera. Finally, the fractalized noise distorts the image to achieve the warped look. Individual meshes can be excluded entirely from the noise calculations by toggling the noise instances using the Flair Toolbox.
This shader style works on any Maya material, even with VertexFX art-direction on the warp amplitude and feathering. However using the Flair material unlocks painterly reflectance models and supports the entire art-direction framework of Flair. The material also contains a Animated setting attribute, which allows to attach the broken edges to animated objects. This can also be achieved on other materials using the Warp Settings.
While production-proven, the warp shader style may not have all features that you need. So please let us know if we can help polish the look exactly to your requirements and pipeline.
Tutorials
Attribute breakdown
In this section, we only document global attributes specific to the warp shader style. To learn more about other global attributes, please see the globals node documentation.
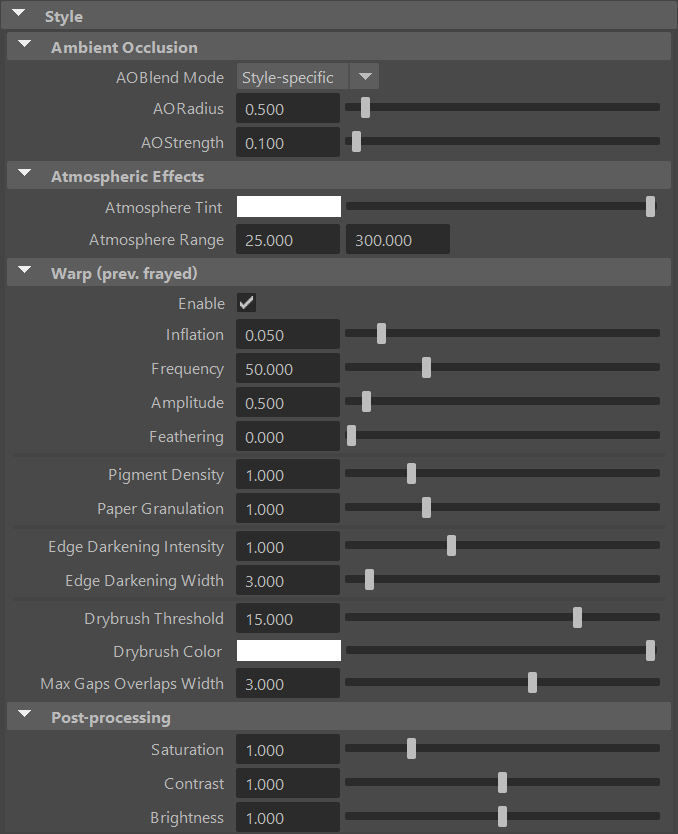
Ambient Occlusion
Ambient Occlusion (AO) darkens the image in areas that are hard to reach for the ambient light due to the local shape of the geometry (e.g. concavities, crevices, holes). Note that this effect depends only on the geometry (and the viewpoint, to a lesser extent), and not on the lights present in the scene.
Flair currently uses a screen-space implementation of ambient occlusion based on the Ground-Truth Ambient Occlusion algorithm (GTAO).
AO Blend Mode
Defines how the computed ambient occlusion is applied on the final image.
- None: AO is not applied.
- Multiply: the AO is multiplied over the image.
- Color Burn: same as above, except that the AO is blended over the image using the Color Burn blending mode.
- Style-specific: AO is applied by the current style, so the effect depends on the style implementation. (default)
- With styles other than the Graph styles, the AO modulates the pigment density, resulting in darker colors in occluded areas.
AO Radius
The radius used by the ambient occlusion filter: larger radius results in larger darkened areas.
AO Strength
The strength of ambient occlusion: higher values make the ambient occlusion darker.
Atmospheric Effects
Atmospheric effects are useful to add atmospheric depth to bigger scenes by changing the color within a specific range.
Atmosphere Tint
Defines a custom atmospheric perspective color, making things at distance tint towards the specified color.
Atmosphere Range
Defines the range at which the atmospheric tint will start and end. Set these values high to not have the atmosphere range affecting your scene.
If you wish to exclude an object from the atmosphere tint affect (e.g., a background plane), enable the Final Color attribute in the Flair shader material assigned to that object.
The range is set for Maya units multiplied by the World Scale, consider this when setting up this attribute.
Warp
Enable
Creates inflated noise instances of objects in the scene to be used for the warped stylization within Maya. You can disable this attribute if you don’t want warped distortions or do not wish to see the noise covering all scene elements in normal Viewport 2.0.
Inflation
Amount of inflation of the noise objects, default: 0.05. Inflation is required to keep the warped distortions outside of the geometry.
Frequency
Frequency of the warped distortions, default: 50.0.
- Higher frequency ⇒ smaller distortions
- Lower frequency ⇒ bigger distortions
Note: if the frequency is too high and the noise enters the sub-pixel size, it will flicker.
Amplitude
Determines the amount of warp distortions, default 1.0.
Note: Increasing the Amplitude will also require a higher Inflation amount.
Feathering
Determines the softness of warped distortions, default 0.0.
Pigment Density
The concentration of pigments, giving the render either a diluted or a more saturated and darker look.
Paper Granulation
The accumulation of pigments on the valleys of the paper (canvas). Concentrates the pigments on the valleys and creates a more saturated and darker look.
Edge Darkening
Edge darkening accumulates the pigments (color) gradually towards the edges, generating darker edges.
Edge Darkening Intensity
Strength of the edge darkening effect. A higher intensity will concentrate more color on the edges.
Edge Darkening Width
Width for the edge darkening effect.
Note: A wider edge darkening will require an increase in intensity, as well.
Drybrush Threshold
Sharpness of the drybrush application. Using a dry brush will only apply pigments to the peaks of the canvas, leaving the canvas color appear at the valleys of its profile.
Drybrush color
Color of the drybrush application.
Max Gaps Overlaps Width
Maximum width of the gaps & overlaps effect.
Post Processing
Post Processing attributes contain simple but useful self-explanatory post-processing filters
- Saturation
- Contrast
- Brightness
This group is closed by default, but can be opened by clicking on it.
Warp Settings
The Warp settings allow additional functionality for the Warp shader style. The available settings can be found in the Flair toolbox, once you click on the Warp settings button.
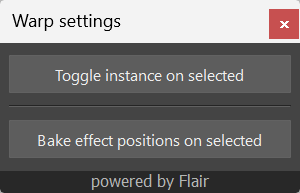
Toggle instance on selected
This button will toggle the inflated instance on the selected objects on/off. Especially useful for transparent objects, so that only objects behind warp the end result.
Bake effect positions on selected
On Flair materials, this button is a convenience function that will check the Animated setting attribute on materials where the selected objects have been assigned into. With non-Flair materials, this is the only way to attach the warp distortions to animated objects.
Considerations
Attach warped distortions onto objects
Activate the Animated attribute within the materials to bake the warped distortion position onto animated objects.
Nurbs surfaces
Nurbs surfaces can’t save any data in vertex colors, so warped distortions won’t stick onto the objects and it won’t be possible to use VertexFX on them.
Inflation
- Vertex normals in objects that are not sub-divided will need to be averaged for hard-edged objects. Otherwise, each face vertex has its own normal and inflation will leave gaps between each inflated face, creating incoherent warped distortions.
- Thin objects should have faces on both sides for the object to inflate correctly.
Warnings
...due to multiply-instanced child
Whenever you get this warning, uncheck the Enable attribute in the Warp globals to remove the instances, make the edits that you previously wanted to do and re-enable the instances.
Art-directable Attributes
Attributes labeled as art-directable can be controlled further with VertexFX and proxy materials.