Material Presets
Table of contents
The Material presets tool allows artists to easily create and load stylized materials within Flair. The tool window can be opened by clicking on the PRES shelf icon.
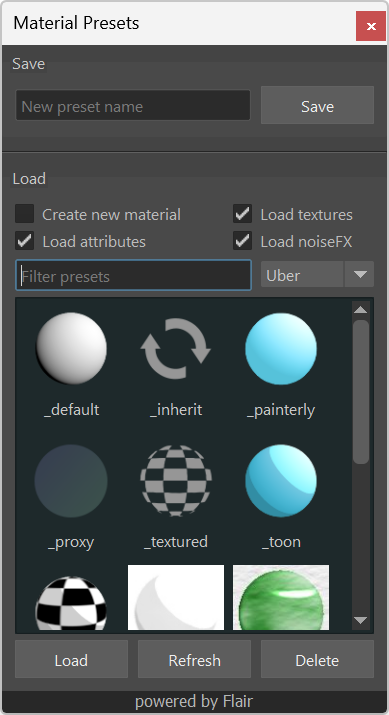
A material preset contains all the available attributes found in the Flair shader, cutout, hatching or the proxy materials, together with a small thumbnail captured from objects where the material was set as it was saved.
Video tutorial
Special presets
While most material presets just contain and set the saved settings and attributes, presets prepended with _ are special, as described below:
- _default preset sets the default attribute values of flair shader materials (revert to defaults).
- _inherit preset will replicate the attributes of whatever is already assigned to the object–thereby inheriting the old material (which can also be a Maya material).
- _proxy preset will create a proxy material, which is invisible but supports the art-direction of effects (see proxy docs)
- _textured preset will only set the attributes required for normal textured materials.
- _toon and _toon_textured are the equivalent to _default and _textured, but with the toon shading setting enabled.
Saving presets
You can save as many presets as you want and these can be created at the top of the Material presets window.
- Select the material or the poly objects/faces assigned to the material
- Name the current preset as desired in the “New preset name” text field
- Press
Enteror click on theSavebutton on the right - A new preset will appear with all attribute values found in the selected material.
Saving a new preset with the same name as an existing preset will overwrite the preset with new attributes.
Loading presets
Presets can be loaded at any time onto selected objects or components.
- Select the poly objects or faces which you would like assign the material onto
- Select the preset that you would like to load in the tool
- Double click on the preset icon or click on the
Loadbutton at the bottom left
Loading the preset will load the material attributes on all objects that share the same material. To avoid this behavior, check the Create new material option within the loading options.
Loading options
The loading options give you more refined control over the loading process:
- Create new material - will force the creation of a new material, no matter what previous material the object had. When unchecked, the existing material will be modified with the attributes of the preset–affecting all objects it is assigned to.
- Load textures - this will load the textures of the selected preset. If you want to keep the current textures, but wish to still import the other material attributes of the preset, uncheck this box.
- Load NoiseFX - this will load the NoiseFX of the selected preset. If you want to keep the NoiseFX of the current material, but wish to still import the other material attributes of the preset, uncheck this box.
- Load attributes - this will load the attributes (other than textures & noiseFX) of the selected material preset. If you want to keep the current material attributes, but still wish to import textures and/or noiseFX, uncheck this box.
Underneath the loading options is a field to filter presets by name, and the drop-down on the right to filter by material type: Uber, Cutout, Hatching or All (no filter). This is especially useful when working with a lot of presets.
By default, only materials corresponding to the current style are shown.
Deleting presets
Presets can be deleted at any time.
- Select the preset that you would like to delete
- Click on the
Deletebutton at the bottom right
A deleted preset cannot be recovered by undoing changes.
Refreshing presets
Each material preset is saved under Flair/maya/presets/materials as a *.json and *.jpg file. Each individual installation will have their own presets, but these can also be shared if Flair is stored in a shared/network folder.
If you or someone else adds/deletes/modifies presets manually within the presets folder, you need to refresh the Material presets window to grab the changes made: click on the Refresh button at the bottom.
Editing and renaming presets
When you right-click on a preset, a context menu will appear with options to Edit or Rename the preset.
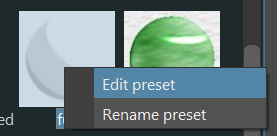
- Editing the preset will open the *.json preset in a text editor to modify to your liking. Remember to refresh the presets after any edits.
- Renaming the preset will prompt to enter a new name for the preset.
Material presets location
Presets are stored in the following locations:
- Specified presets folder in environment variable
FLAIR_PRESETS_PATH(FLAIR_PRESETS_PATH/materials) [optional] - User presets folder (
AppDocuments/Flair/presets/materials) [In system-wide installations:For all users] - Installation presets folder
In case a preset exists in multiple locations, the preset on the first locations will override presets in later locations.
Material Presets API
The Material Presets tool manages an instance of the material presets library, available within the material presets module of the Flair API. You can use this API to automatically save or load different presets within your custom pipeline.