Proxy Materials
Table of contents
Proxy materials are invisible materials that only render effect control maps within Flair, thereby not rendering any color but only modifying effects on the final image, instead.
Any mesh assigned to a proxy material becomes an art-direction tool to stylize elements in the scene. This makes them extremely versatile as they can change effects at all levels of control. For example, they can affect the entire image by being placed in front of the camera as a proxy card, or affect only a specific part of the scene in 3D space by being placed in front of it. The tutorial below showcases this versatility.
Any flairShader material can become a proxy material by toggling the proxy setting, but proxies can also easily be created or assigned from the material presets tool using the proxy preset.
As flairShader materials, proxies are divided into optional Proxy Settings and Proxy attributes. The proxy attributes are always present no matter what settings are enabled, so let’s introduce them first.
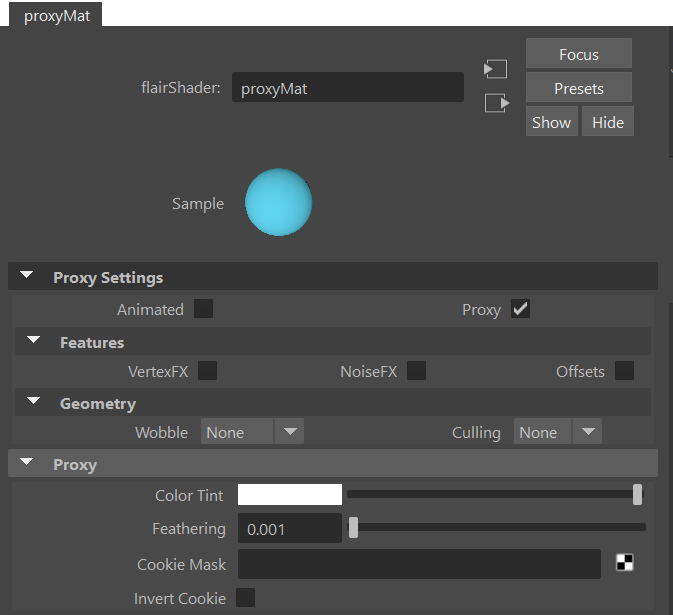
Proxy
Proxies show few parameters by default, as effect control is achieved mostly through the VertexFX and NoiseFX tools being applied onto the material.
Color Tint
Color Tint darkens pixels with a specified color. This attribute is especially useful for materials like tinted windows.
Feathering
Feathering softens the hard edges of the proxy materials. This effect works as a fresnel, so it shows best when the material is applied to round objects.
When proxies clip with other objects, a hard edge might be visible due to the compenetration of meshes. Use the Wobble Blur effect to achieve a smoother transition and feathering when compenetration becomes an issue.
Cookie Mask
Cookie Mask specifies an image containing a mask of the proxy. It is especially useful if you place a proxy plane (card) in front of the camera to create effect vignettes.
Invert Cookie
Invert Cookie inverts the applied Cookie Mask values.
Proxy Settings
The first section provides the Proxy Settings that allow to customize what optional features the proxy material should have.
Animated
The Animated setting bakes the current position of vertices so that effects that rely on the 3D positions can stay in place when proxies are deformed/animated. If this setting is not enabled, features like NoiseFX or Wobble would float around in 3D space and not move with the proxies.
Proxy
The Proxy setting enables the proxy material behavior. When disabled, the proxy material will become a normal flairShader material.
VertexFX
The VertexFX setting toggles the control of effects through vertex colors. The attribute is automatically enabled by Flair and is toggled as soon as you start painting with the VertexFX tool.
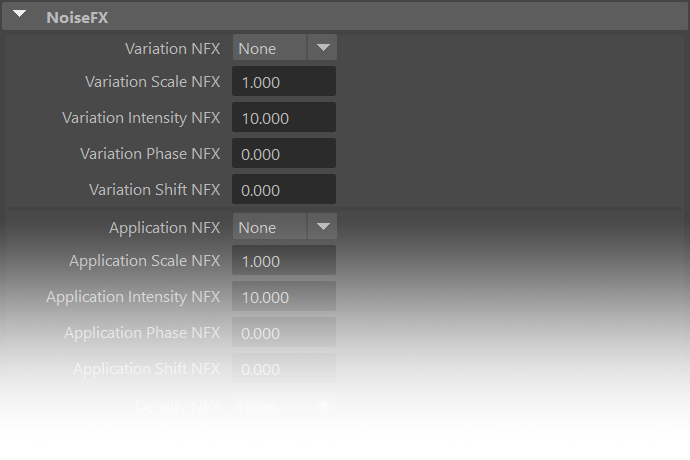
NoiseFX
The NoiseFX setting toggles the use of NoiseFX in the material and enables the NoiseFX section at the bottom of the Attribute Editor. NoiseFX is generally toggled automatically when the NoiseFX tool is used and allows you to key and animate NoiseFX attributes when needed.
Offsets
Flair 1.2
The Offsets setting toggles the available offsets and the respective section within the Attribute Editor. The effects of these attributes will only be visible on effects and styles that work with thresholds and depth i.e., lines.
For example, with the right thresholding offsets, you can have only outlines (silhouette) appear behind a proxy plane, thereby changing how lines draw at a certain depth.
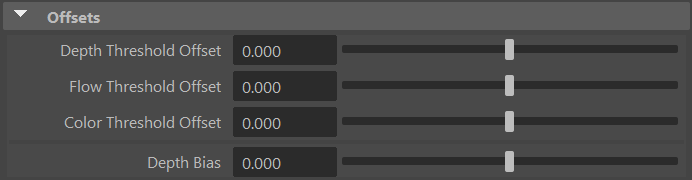
Depth Threshold Offset
Depth Threshold Offset modifies the global depth threshold on everything inside or behind the proxy material
Flow Threshold Offset
Flow Threshold Offset modifies the global flow (normals) threshold on everything inside or behind the proxy material
Color Threshold Offset
Color Threshold Offset modifies the global color threshold on everything inside or behind the proxy material
Depth Bias
Depth Bias offsets the depth of the proxy material to help fix potential depth-based artifacts with overlapping geometries.
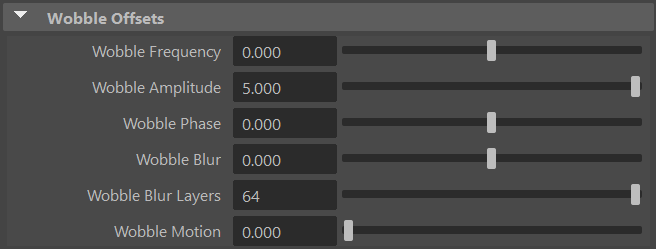
Wobble
Flair 1.2
The Wobble setting activates the use of wobble offsets within the proxy and toggles its attributes in the Attribute Editor. These material attributes offset the global wobble values set in the globals node, so make sure to enable and set the wobble effect globally first.
Different types of wobble noise can be specified for different results
- None - No wobble is applied
- Simple - Default simplex wobble noise
- Cloud - More detailed fractalized wobble noise resembling the “cloud” noise in Photoshop (better appreciated at a higher polygon count).
- Custom - Custom noise, which can be written in glsl
flair/maya/shaders/material/include/noise.glsl[customNoise3(vec4 v)].
Once the wobble attribute has been enabled globally, material presets will default as wobbled (Simple).
It is difficult to clearly visualize the wobble on a proxy, so the examples below feature the normal flairShader material. However, the exact same deformation and diffusion applies to proxy materials, as well.
Wobble Frequency
Offsets the regularity of the wobble. A higher frequency will make the wobble more “irregular”, whereas a lower frequency will make it more “regular”. The frequency is directly linked to the global World Scale.
Wobble Amplitude
Defines the amount of wobble. A higher amplitude will deform more than a lower amplitude. The amplitude is directly linked to the global World Scale.
Wobble Phase
Defines the form of the wobble. Useful when you want a different wobble deformation or want to vary the wobble on a frame-by-frame basis.
As wobble is generated from noise in 3D, make sure to toggle the deformed attribute in materials if they are animated/deformed so that the wobble is baked in place.
Wobble Blur
Defines the amount of wobble blur for TAA samples, generating a soft edge by averaging different wobble positions as layers.
Wobble Blur Layers
Defines the amount of wobble blur layers i.e., the amount of wobbled positions to use during the wobble blur.
With a low layer amount, you can use Wobble Blur to achieve a layered watercolor look!
Wobble Motion
Defines the amount of motion offset of the wobble, generating streaks of motion under animation. For this attribute to show its effect, make sure that velocity is enabled in the Globals node and in the material.
Culling
The Culling setting defines which faces should be culled within the proxy.
- None - No culling, all objects with the material are rendered as double sided.
- Front - The front-facing faces are going to be culled, only rendering the back faces.
- Back - The back-facing faces are going to be culled, only rendering front-faces. This can help performance on objects with many polygons.