VertexFX
Table of contents
The VertexFX tool allows localized control of effects at the vertex level onto poly meshes. The tool is opened by clicking on the VFX shelf icon and shares the same window with the NoiseFX tool.
Each Flair material (including proxies) supports VertexFX, but the effects driven by VertexFX depend on the loaded style. To paint VertexFX, select an object with a Flair material, click on the paint icon of the effect that you want to paint with and start painting.
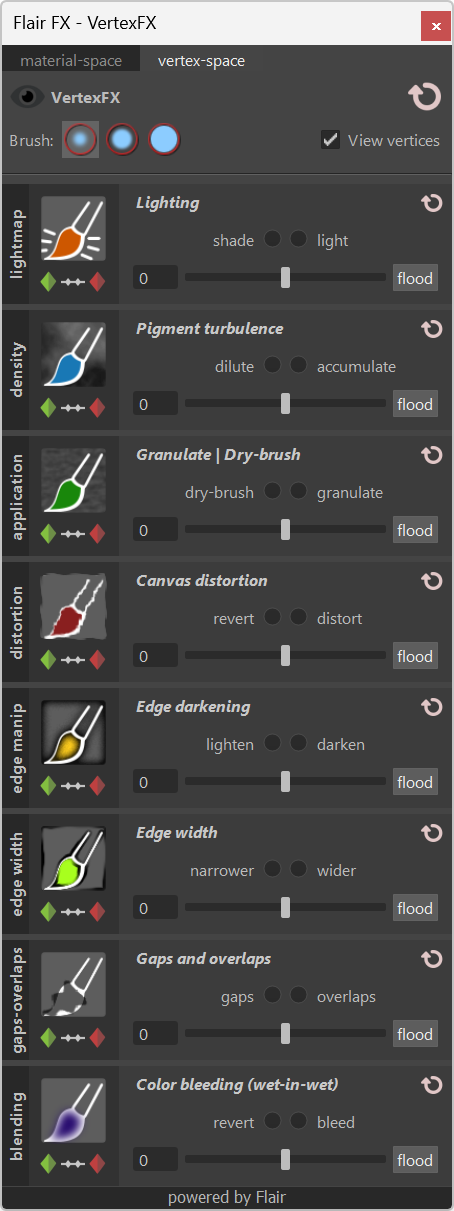
From top to bottom, these are the different elements of the VertexFX tool.
On the top-left, you will find an eye icon which toggles the parameter view. This will allow you to view the control parameters that you are currently painting.
On the top-right, you will find the reset button, which resets ALL VertexFX of either, the selected objects, or ALL objects in the scene when no selection is active. A prompt will ask for confirmation, listing the objects that will have their VertexFX removed.
On the next row, there are buttons to set the brush stamp to use when painting the different effects. To their right, you will find View vertices, if enabled, the brushes will show the vertices underneath where VertexFX are being painted onto.
Paint Widgets
Each style has different effects, therefore, the paint widgets (sections) will vary depending on the currently loaded style. Each widget handles a specific effect/behaviour within the style e.g., Lighting, Pigment turbulence, Color bleeding.
On the left side of each widget, you will always find a generalized term for the behaviour of each effect. Right next to it, there will be a brush icon that gives a preview of what the effect will do.
By clicking on the brush icon, you can quickly start painting the effect with the currently defined values on selected objects. Before going into more details on painting, let’s break down the widget.
Keyframing VertexFX
Underneath the brush icon, you will find three buttons, which will allow to animate VertexFX values.
This button will key the painted values of selected vertices at the current frame, allowing to animate the painted effects.
This button will show the keyframes in the timeline of selected vertices/objects allowing you to adjust timing or delete keyframes of painted effects. It will also show the keyframes in Maya’s Graph Editor.
This button will remove the key of painted values of the specific effect from selected vertices at the current frame.
As Maya stores the value of each vertex internally on adjacent faces. This means that, if you are keying one vertex with four values (RGBA), that is shared with four adjacent faces, you will be keying 16 values—for only one vertex. This escalates exponentially when keying objects with hundreds of vertices. Therefore, try to use proxies and animate them instead, whenever possible.
To keep complex scenes light after working with VertexFX, we recommend deleting Non-Deformer History (Edit->Delete by Type->Non-Deformer History) whenever possible.
Modifying Paint Values
To modify the painting values of each widget, you can use the radio buttons to quickly change between the two painting modes and adjust the horizontal slider at the bottom of the widget to set the painting value/intensity. The painting value/intensity can also be entered manually to the left of the slider.
By modifying a painting value, the tool will automatically change to painting mode, so there is no need to click on the painting icon anymore.
Reset and Flood
The painted values can be reset or flooded (added) on the selected objects/vertices. There are two buttons for this at the right of each widget. These buttons are useful when you need to assign a specific value to a lot of vertices of an object, be it to reset the VertexFX, or to add the effect evenly to the selected objects/components. Reset will put the values of the selected objects/vertices to zero (0) whereas flooding will add the numerical value of the painting value.
Shortcuts
-
b - press-and-hold
band click-and-drag with your left mouse button to reduce or increase the brush size. -
q - press
qto get our of the painting mode.
Showcase
First we select the object we want to paint. Using the VertexFX tool, we accumulate the pigment and add color bleeding by painting. Afterwards, we flood the granulation effect with paint, then reset its values to flood dry-brush instead. At the end, we reset the dry-brush effect.
FAQ
The scene size becomes too big after using VertexFX
This happens because Maya is not optimized to save a lot of data on vertices. Thankfully, in the globals node, you can define to separate the stylization of the scene and save it in a different file. The option Yes, save and replace will make your Maya scene lighter again.
Painting VertexFX is super slow
Painting vertices on objects with many polygons can be quite slow in Maya, depending on how many vertices the object has. So, make sure you are not working in ‘subdivided preview’ mode (‘3’ on your keyboard) during painting or try separating meshes to reduce the amount of vertices that Maya needs to iterate over while painting.
Can I apply VertexFX on Nurbs or changing topology?
This is unfortunately not possible as nurbs don’t have vertices to save the painted effects onto.
Can I paint VertexFX on meshes with changing topology?
It is possible but not recommended. If you change the topology, the vertex count will also change so you may encounter unpredictable behaviors and even Maya crashes.