Import/Export
Table of contents
Importing and exporting the stylization is crucial for professional production workflows and can easily be done with the Import/Export tool. The tool window can be opened by clicking on the im/ex shelf icon.
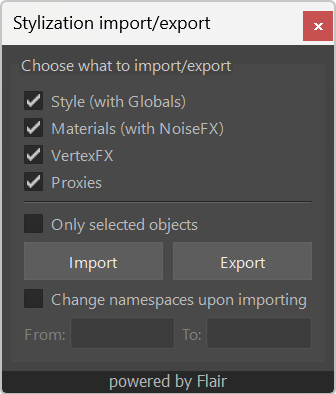
At the top of the Import/Export tool, you will find the different options thereof.
- Style - style globals node’s attributes.
- Materials - Flair materials with all their attributes and NoiseFX.
- VertexFX - all painted vertexFX parameters.
- Proxies - geometry proxies, their material and painted effect parameters.
By default, the tool will export everything and import everything (if available in the exported files) into the current scene, without changing any namespaces.
Exporting
Exporting the stylization is straightforward:
- Check/uncheck the different options that you wish to export
- Check/uncheck if you want to only export the selected objects or all objects in the scene.
- Click on the
Exportbutton - Navigate to the directory where you want to save the stylization into and
Save.
The Style, Materials and VertexFX of the scene are saved as a *.style file, whereas the Proxies (if they exist) will be saved as an *.fbx file.
You only need to export the first option (Style) to transfer the stylization to Nuke.
Importing
Importing the stylization will work smoothlessly as long as the naming and hierarchy of objects is consistent.
- Check/uncheck the different options that you wish to import
- Check/uncheck if you want to only import onto the selected objects or all objects in the scene.
- Click on the
Importbutton - Navigate to the directory where you saved the stylization, select the *.style file and
Open.
Changing namespaces
If you are importing the stylization from a scene where the assets used different namespaces, you can check the Change namespaces upon importing checkbox.
- In the From field, you put the old namespaces (separate namespaces with a colon:
:) - In the To field, you put the new namespaces (separate namespaces with a colon:
:)
If assets in the exported stylization didn’t have any namespace, you can leave the From field empty and just enter the new namespace in the To field.
You can import and change multiple namespaces at the same time. If this is the case, the first namespace in the From field will be changed to the first namespace in the To field. The second, with the second one, and so forth.
Auto import/export when saving
To reduce the Maya scene size when painting VertexFX onto referenced assets, we started automatically saving the stylization alongside the scene. The automatically saved style shares the same name as the scene, albeit with the .style extension.
This generated *.style file is saved in the same directory as the Maya scene. Being next too each other will guarantee the auto-loading of the style upon opening, importing and referencing the scene, when necessary.
Also, if for whatever any reason the style in the Maya scene gets corrupted, you can import the automatically saved .style file to recover the style and art-direction.
Importing and Exporting in custom pipelines
Custom production pipelines may have further importing and exporting requiremets. This section is meant to facilitate integration of the Flair import/export tool into them.
Import/Export API
The import/export tool programatically calls the import_stylization() and export_stylization() functions, which are found in the flair_import_export module. As documented in the Flair API, you can use these functions to create your own import and export procedures within your custom pipeline.
The *.style files that Flair uses are text files containing a python dictionary. Therefore, these files can easily be loaded by calling eval() on their contents.
Custom imports
There are two custom import functions available. These can be used by right clicking on the im/ex shelf icon.
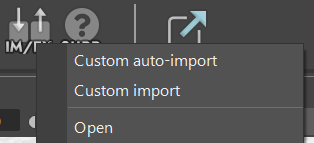
Custom auto-import
Can be customized within the _custom_import_export.py module to automatically browse the style of assets in the scene and apply them with predetermined values.
Custom import
Can be customized within the _custom_import_export.py module to have any kind of predefined options, namespace changes and even prefixes applied.
Refer to the _custom_import_export_example.py file within flair->maya->scripts for an example on how these functions can be customized.