Interface Overview
Table of contents
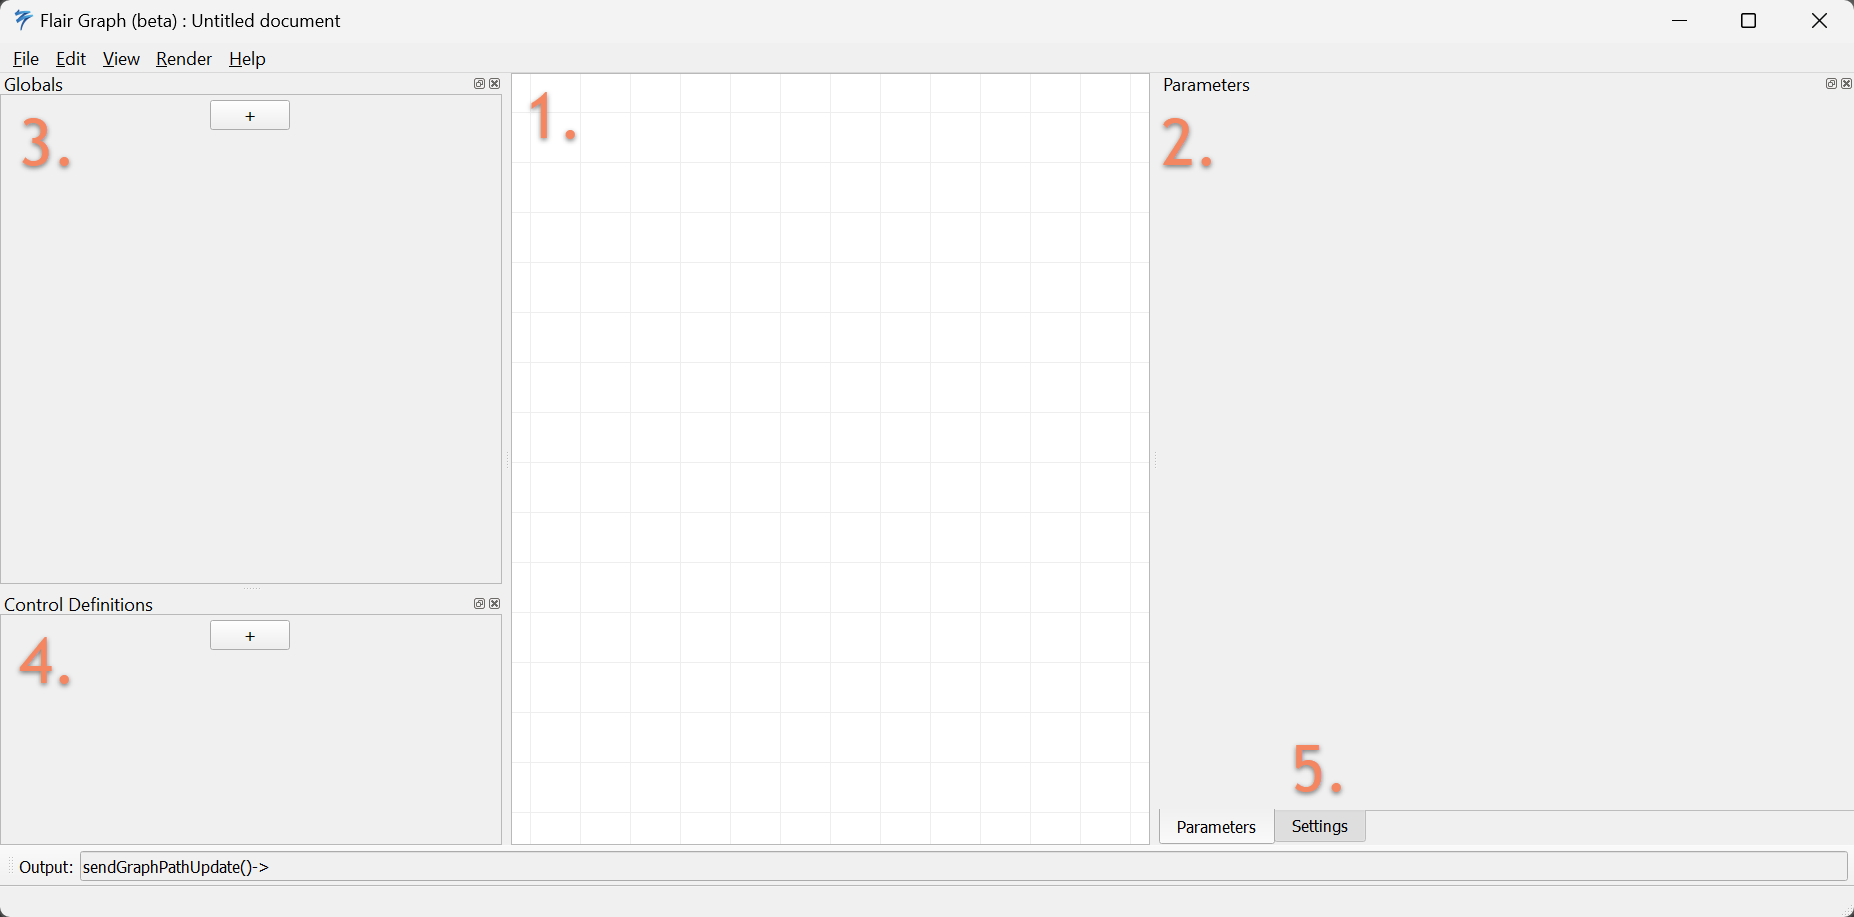
The Flair graph interface comprises 5 distinct panels (sections), each responsible for defining and controlling the shader style.
This page contains an overview on how to interact with Flair and where to dive deeper when necessary. All panels can be toggled anytime through the View button in the Flair Graph menu.

1. Node Graph
The node graph is the central node interface defining the shader pipeline. In this panel, you can create nodes, select them to modify their properties and connect them to each other to build an image-processing shader pipeline. You can consider it the “document” where the shader pipeline is “written” with nodes.
Further documentation on how to interact and what can be done with the node graph can be found here.
2. Parameters
The parameters panel is context sensitive, showing the parameters of selected nodes in the graph. If no node is selected, it will be blank. In Maya, this would be the equivalent of the Attribute Editor. When a node is selected, the Parameters panel will show the available parameters.

- Type of node, in this case a
shadernode. - Name of the node, which can be defined/set here.
- Input parameter name, automatically prepended by an
i:for “input”. - Exact value of the parameter. In this example, we have a float parameter, but this will look different depending on the type of parameter.
- An optional interface to interact and set the parameter without inputing exact values.
- Parameters that support expressions, will show a “magic wand” icon () to the right of them. Once toggled (clicked), the widgets to set values will be replaced by a green text field to enter an expression (see 7).
- Text field to enter expressions. Learn more about expressions here
More details about node parameters are available in the documentation for each node type.
3. Globals
The globals panel defines the global attributes that will be available in the Maya Attribute Editor. The same globals can also be used in expressions within shader node parameters. Supported global values can be:
- integers (
int) - floats (
float) - vectors (
vec2,vec3, orvec4) - or options (
enum).
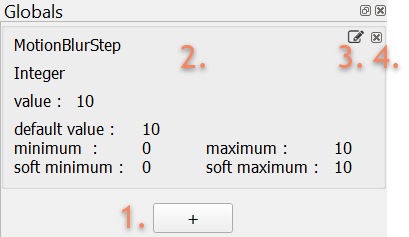
Globals are declared in the Flair graph using the Globals panel Menu→View→Globals and are defined (set) in the host application (i.e., Maya).

+button opens the “Add a Global” dialog (shown below), which helps add global attributes.- Current properties of the global will change depending on the type of global attribute.
- Edit the global attribute, this button will open the “Add a Global” dialog again for editing.
- Delete the global attribute.
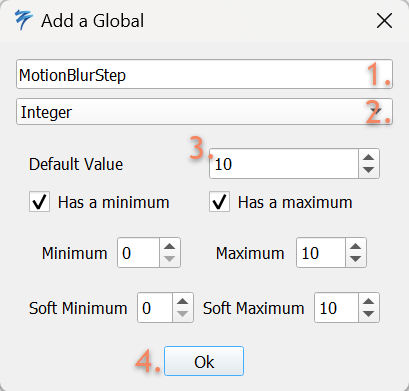
Once the + button is clicked, the “Add a Global” window appears to add or customize existing globals.

- New Global attribute name (some names are reserved by Flair, including names starting with “_”).
- Type of Global attribute to create
- Properties of the Global attribute, this will change depending on the type of Global being created. For
enumglobals, the first field you indicate will be set as the default field. Okwill create the global.
When a global is added, it can be used by its name in parameter expressions and will be automatically appear in the Attribute Editor within Autodesk Maya. The global can be set and keyed in Maya for each frame and is automatically udated in the Flair graph.

4. Control definitions
The control definition panel dynamically defines the noiseFX and vertexFX controls available to control the shader style in Maya.

+button adds a new definition group to define a new control. A definition group is comprised of two sections, the left section contains the control properties, whereas the right sections defines the naming of control options. The tooltips shown when hovering over elements explain their use, which is also documented below.- Name of the control written vertically on the left side of the vertexFX and _noiseFX widgets.
- Description of the control appearing on top of the control.
- Control target (image) that the control will modify. Flair currently supports only 4 targets.
- Channel that the control will modify in the target (image). Some targets support the modification of more than one channel for the same control.
- If “Only Positive” values are to be modified. Default are positive and negative values.
- VertexFX options to increase or decrease the control parameter.
- NoiseFX option to increase the noise fluctuation of the control parameter e.g., density effect noise can be called turbulence.
- Delete the control definition group.
Each control definition group will automatically modify the NoiseFX and VertexFX interface within Maya.


Customizing the icons in VertexFX and NoiseFX control widgets
To customize the icons that appear on the VertexFX and NoiseFX tool in Maya, you need to place icons with the exact same name as in the control definition (1) in the Flair/maya, under icons/nFx or icons/pFx.
5. Settings
The settings panel defines the graph settings, which are globals that only affect the current Flair graph document.

When using the Flair graph as a plugin, this panel can be mostly ignored as the values are automatically gathered from the host application.
Project Directory
Allows to set a directory, which other file paths can be relative from. This is useful for sharing Flair graphs with others.
World Scale
Defines a global world scale for converting between different 3D measurement units.
