Installation
Table of contents
Installing Flair is as simple as a drag-and-drop.
- Make sure you have all pre-requisites
- Download and extract all the contents of the Flair zip file into any folder outside of Maya
e.g.,Documents/Flair,Downloads/Flair, a shared drive. - Open the folder where you extracted Flair into, this will become your installation folder
- Drag-and-drop the
install_maya.melfile onto the Maya viewport - Select for whom you want to install Flair for and click
Accept(see options)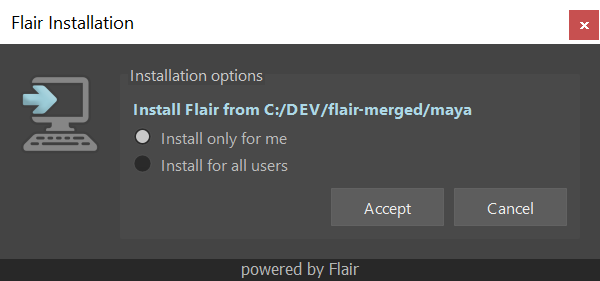
Flair installation prompt that appears after the viewport drag-and-drop. - Upon successful installation, a restart prompt will appear
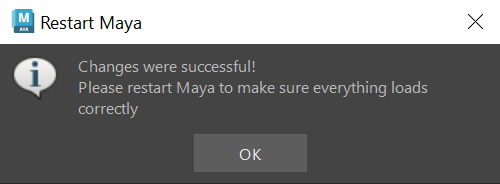
Flair has been successfully installed. - Restart Maya
- After restarting, the Flair shelf should appear in Maya
- Click on the
globortestshelf button to verify the installation and prompt the Flair activation - Activate Flair if needed.
If the drag-and-drop of the install_maya.mel file fails, make sure that its directory only contains valid ASCII characters, or Maya won’t be able to read the MEL file.
Installation options
Only for me
Recommended for individuals for simple installations without admin rights.
The installer will only insert the Flair paths into your Maya.env file for the Maya version in use.
All flair-related files are kept within the Flair installation folder, except for the license file, which is placed in:
- Windows:
Documents/maya - macOS:
~/Library/Preferences/Autodesk/maya/ - Linux:
~/maya
The “Only for me” option allows keeping different versions of Flair on different versions of Maya. However, everyone using Flair will need read/write permissions to the Flair installation folder.
For all users
Recommended for studios or institutions where multiple artists use Flair from the same workstation/server.
This method allows installing Flair automatically in all supported Maya versions, even in environments with strict read-only policies e.g., Rez.
The Flair installation “For all users” requires admin/sudo privileges to place files in:
License and modules
- Windows:
%CommonProgramFiles%/Autodesk Shared/Modules/maya - macOS:
/Users/Shared/Autodesk/modules/maya/ - Linux:
/usr/autodesk/modules/maya
Canvas caches
- Windows:
%ProgramData%/Flair - macOS:
/Users/Shared/Flair - Linux:
opt/Flair
After installation and activation, artists will find their presets and preferences in:
- Windows:
Documents/AppDocuments/Flair - macOS:
~/Library/Preferences/Autodesk/AppDocuments/Flair - Linux:
~/AppDocuments/Flair
If you need to customize where the program data (caches) and app documents (presets/preferences) are stored, you can follow the instructons within flair/maya/scripts/coop/_custom_dirs_example.json.
Only for me (but read-only)
There is a third hidden option where you can make an “Only for me” installation read-only by setting the environment variable FLAIR_READ_ONLY=1. This will force Flair to behave as if it was installed “For all users”.
For this installation to work properly, make sure the directories to save canvas caches, presets and preferences have read/write access for artists using Flair, as these will default to the “For all users” directories (which can be customized within the _custom_dirs_example.json file).
Keep in mind that the license will remain within the local Maya folder, so it won’t be available for other users.
FAQ
I can’t install ‘only for me’
If the user-based installation won’t work no matter what, you can manually enter the required environment variable in the Maya.env file.
- Open the Maya.env file usually found in
Documents/maya/202X/Maya.envwith a text editor (make sure its the Maya.env file of the version of Maya you want to install in) - Enter this environment variable:
MAYA_MODULE_PATH=#YOURFLAIRMAYAPATH#(replace #YOURFLAIRMAYAPATH# with the path whereFlair/mayais located) - Restart Maya.
I can’t install ‘for ALL users’
The installation for all users requires administrator rights in the computer where you are installing Flair in. This is because we need to put the module file within Program Files. To do this manually, follow the steps below:
- Duplicate the flair.mod file within the
Flair/mayafolder and open the duplicate with a text editor. - Change all
./with the path to the Flair folder (with forward slashes) and save. - (Windows) Copy the edited flair.mod and paste it in
Program Files/Common Files/Autodesk Shared/Modules/Maya/202X(paste it in the Maya version that you want to install Flair in). - Restart Maya.
Flair doesn’t load on macOS
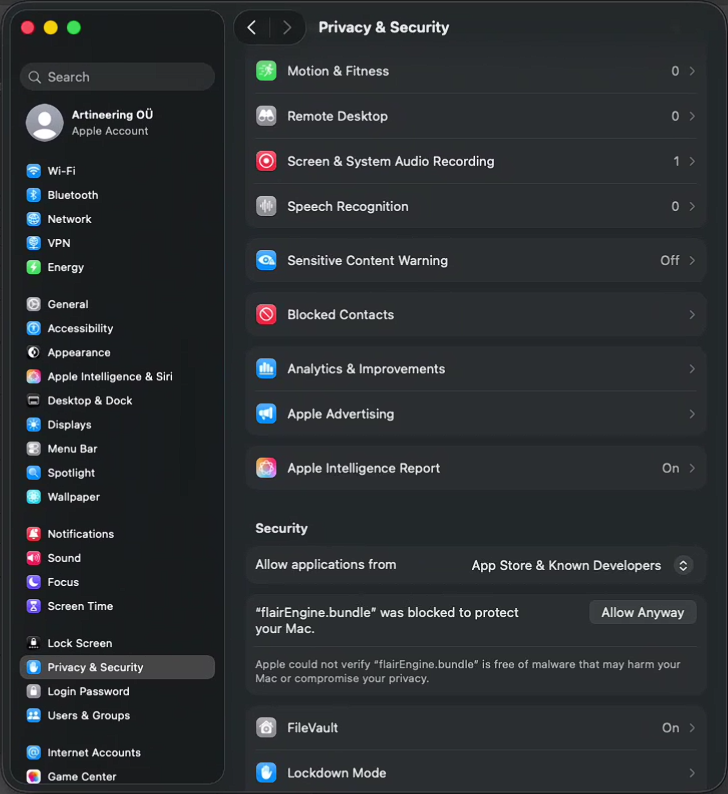
macOS is particularly strict when an app has not been “vetted” through the App Store. You will need to allow flairEngine.bundle and libomp.dylib to run in your system.
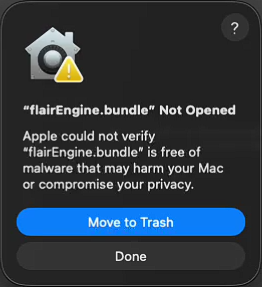
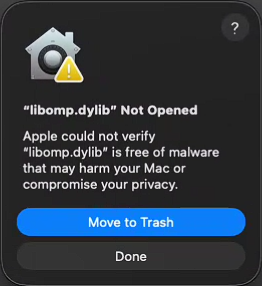
When these prompts appear, just click on Done to dismiss them. Then go to Apple menu -> System Settings...->Privacy and Security. At the bottom, you will find the blocked applications with the option to Allow Anyway. Do so for both the flairEngine.bundle and libomp.dylib.
Once you do so, the prompts will appear again, but this time with an option to Open Anyway.
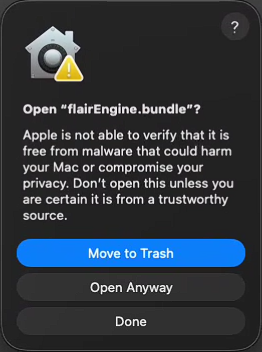

Click on Open Anyway to allow Flair to run on your Mac.
If you can’t see the flairShader material render, restart Maya one last time so that Flair can run normally with all permissions set.